Creating a VI that Inserts Data
http://digital.ni.com/public.nsf/allkb/02971A30F5D8FC6986256A0A004F11A0
This is a helpful link
To be able to insert a simple picture into labview only three functions need to be put in the block diagram.
The first is a read JPEG file icon. The purpose of this icon is that it converts the image files to data so that
it can be read by labview. The next icon that needs to be added is the Draw Flatten Pixel map. This takes the data
and actually creates it into a picture. The final item that is added is the picture icon. This is what actually
displays the picture onto the front panel.
Then With Sven I built a program that can take an image file and import so that it is shown on an intensity screen.
The first icon needed was a file path. While again a read JPEG file icon and a Draw Flatten Pixel map is also
needed. Then the picture to pix map is included. This takes the picture and converts it into data so that many applications can be used with the picture. A constant needs to be added, this constant tells how many bit the pixel map will be. After this icon an unflatten pixmap icon is added. This is needed because the draw flatten pixel map flattens the data and this icon unflattens it. The last icon that is added is the intensity graph so that the image can be seen on the front panel.
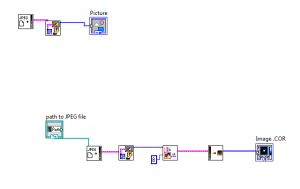
In the picture top program is to insert just an image, while the bottom program is to insert an image into an intensity graph.